Rigging Safety Begins Before the Lift
Rigging is the backbone of any professional stage production. Whether hanging lighting trusses, moving heads, speaker arrays, or scenic elements, maintaining mechanical integrity is essential for both safety and performance. One often overlooked but critical step in rigging prep is the balance check.
Skipping this step—or performing it improperly—can lead to misaligned loads, excessive stress on clamps or truss spans, structural fatigue, and, in the worst cases, catastrophic failure. A simple balance error before lift can cascade into expensive damage or serious injury.
This article explains how to conduct balance checks and integrate them into your rigging workflow to protect gear, infrastructure, and crew.
What Is a Balance Check?
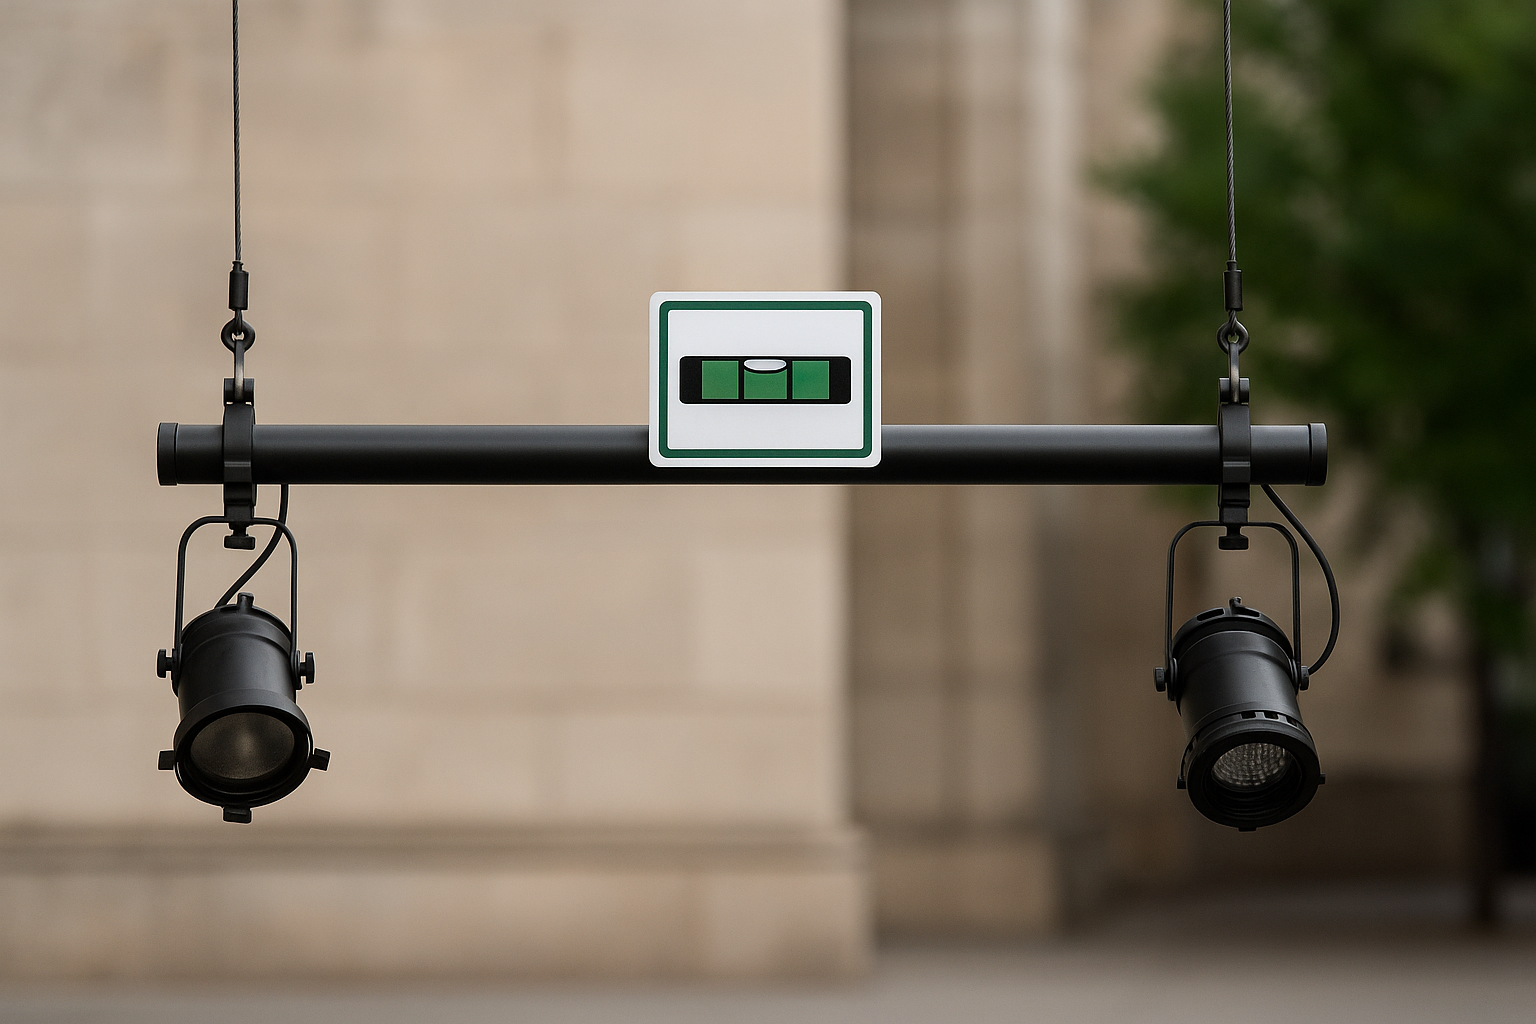
A balance check ensures that a suspended item—whether it’s a lighting fixture, truss segment, or scenic piece—hangs evenly and behaves predictably once lifted. It confirms that the center of gravity (CoG) is in line with the suspension points and that the weight distribution does not twist, rotate, or tilt the object unexpectedly.
Proper balance:
Minimizes torque on clamps and brackets
Reduces truss deflection
Ensures smooth focus and pan movement for fixtures
Prevents accidents during lift or transport
Why Imbalance Happens
Imbalance often results from:
Mounting fixtures unevenly along a bar
Not accounting for weight differences between fixture types
Failing to factor in power/data cable drag
Placing heavy accessories (barn doors, filters) only on one side
Rigging from asymmetrical yoke positions
Even a 1–2 kg offset on one side of a bar can create a tilt large enough to stress mounts or displace focus angles.
Common Risks from Poor Balance
Truss Strain and Bending
Unevenly loaded trusses can bow or torque under stress, shortening lifespan or compromising safety.Clamp Slippage or Failure
If loads shift after lifting, clamps may loosen or slip, especially under dynamic conditions like outdoor shows.Motor or Hoist Overload
Motors lifting asymmetrical loads experience uneven strain, leading to premature wear or failure.Gear Misalignment
Moving heads or followspots can lose programming alignment if mounted off-angle or on a tilted pipe.Operator Safety Hazards
Sudden load shifts during rigging can injure crew, especially during manual lift setups or ladder work.
Step-by-Step Balance Check Procedure
Assemble the Unit at Ground Level
Fully mount all lights, cabling, safety cables, and accessories before lifting.Conduct a Low Lift Test
Use chain hoists, floor stands, or low-level lifts to raise the unit a few inches off the floor. Observe for tilt, twist, or unexpected swing.Check Center of Gravity
Identify whether the suspension points are centered relative to the unit’s mass. Adjust if needed by repositioning clamps or sliding brackets.Secure Cable Routing
Ensure that power and DMX cables don’t pull one side of the unit downward. Use cable ties or looms to center drag.Document Fixture Layout
Take a photo or schematic of balanced rig layout for re-rigging reference, especially on touring shows.Apply Redundant Safeties
Use safety cables and secondary attachment points regardless of how well balanced the unit appears.
Special Considerations for Complex Loads
Multi-Fixture Bars
If combining different types of fixtures (e.g., spot + wash), weigh each and distribute symmetrically or counterbalance with ballast weights.
Asymmetrical Scenery or Screens
Use rigging points adjustable along the structure or rigging bars with sliding track clamps.
Motorized Fixtures
Verify CoG remains consistent as the head moves or tilts. Dynamic imbalance can increase wear and reduce lifetime.
Training and Communication Are Key
Even seasoned riggers can overlook balance, especially under pressure. To mitigate this:
Include balance check in your daily rigging checklist
Train all crew on how to recognize signs of imbalance
Assign a “balance supervisor” during large setups
Share balance plans with lighting and audio departments in advance
On shows with tight changeovers or complex fly systems, balance planning should begin during the design phase—not at load-in.
Real-World Example: Festival Rig Near Miss
At a summer festival, a 3-meter truss loaded with 5 different LED fixtures was flown into place during rehearsal. Upon lifting, one end dropped 20 cm, causing the truss to tilt dangerously and stressing the motor brake. The cause? A 6-kg imbalance due to unequal fixture distribution and a tight power cable pulling the right end down.
After emergency reset, the crew implemented mid-rig balance verification and cable rerouting, preventing further problems during the weekend.
This underscores how even minor misjudgments can lead to major risks.
Conclusion: Balance Saves Gear and Lives
Balance checks may seem like a minor step, but they are one of the most cost-effective and safety-critical elements of any rigging workflow. They ensure your trusses, fixtures, and hardware operate within safe tolerances—and give your crew confidence during setup and teardown.
By building balance into your pre-rig protocols, you safeguard equipment, streamline focusing, and protect your team.
READ MORE:


Blue Sea Lighting is an enterprise with rich experience in the integration of industry and trade in stage lighting and stage special effects related equipment. Its products include moving head lights, par lights, wall washer lights, logo gobo projector lights, power distributor, stage effects such as electronic fireworks machines, snow machines, smoke bubble machines, and related accessories such as light clamps.
Quick Links
For more questions subscribe to our email