In stage lighting, brightness is important, color is important, and movement is important. But if the beam direction is wrong, even the most powerful fixture may fail to create the desired effect. A beam that misses the performer, a wash that spreads too widely, or a spotlight with a blurred edge can weaken the whole stage picture. This is why focus and angles are key skills for every lighting designer, technician, and event planner.
Good beam control is not only about pointing a light at a target. It is about understanding where the light starts, where it travels, how wide it becomes, how sharp the edge looks, and how it interacts with other beams on stage. When these details are handled well, the audience can clearly see the main performer, feel the depth of the stage, and enjoy a more professional visual experience.
This article explains three practical parts of beam direction control: the difference between narrow spot beams and wide wash beams, how to calculate coverage area according to hanging height, and how to switch between sharp and soft edges during focusing.
1. Understanding Beam Angle: Spot and Wash Applications
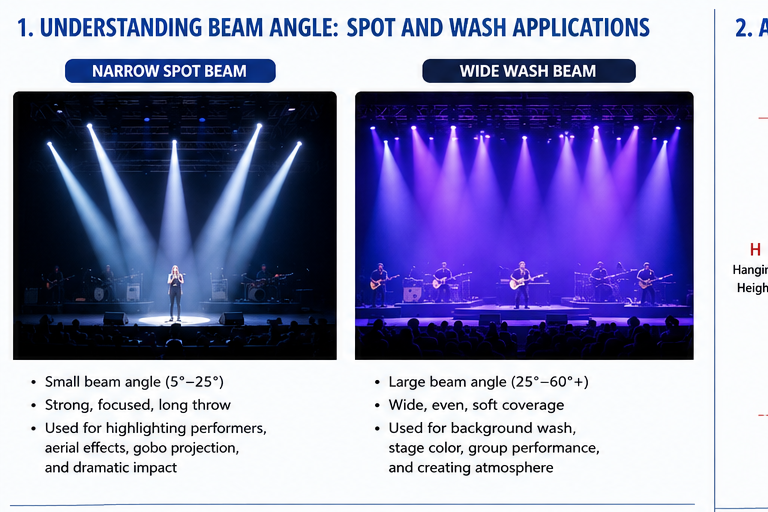
Beam angle means how wide the light spreads after it leaves the fixture. A smaller beam angle produces a narrower and more concentrated beam. A larger beam angle produces a wider and softer area of light. In simple words, beam angle decides whether the light acts like a “sharp pointer” or a “wide brush.”
What Is a Narrow Spot Beam?
A narrow spot beam is usually used when you need clear direction, strong impact, and visual focus. It creates a concentrated column of light that can cut through haze or smoke and form a strong line in the air. This type of beam is often used in concerts, DJ shows, nightclubs, opening ceremonies, and large-scale stage performances.
The biggest advantage of a spot beam is attention. When a narrow beam hits a singer, dancer, speaker, or product, the audience immediately knows where to look. A spot beam can also create dramatic movement. For example, when several moving head lights sweep across the stage in the same direction, the result feels powerful and energetic.
Spot beams are also useful for highlighting details. In theater, a narrow beam can light only one actor’s face or one small object on a table. In product launches, it can focus attention on a car, jewelry display, award, or logo. In weddings, it can highlight the couple during entrance, vows, or first dance.
However, narrow beams also have limits. Because the beam is concentrated, it covers a smaller area. If the fixture is not aimed accurately, the light may miss the subject. If the performer moves too much, the beam may no longer cover them. This means spot beams need more careful positioning and focusing.
What Is a Wide Wash Beam?
A wide wash beam is used when you need broad, even, and comfortable coverage. Instead of creating a narrow line, it spreads light across a larger area. Wash lighting is commonly used for stage backgrounds, dance floors, audience areas, conference stages, theater scenes, and architectural surfaces.
The main advantage of wash lighting is atmosphere. It fills the stage with color and brightness, making the whole space feel complete. A blue wash can create a calm mood. A red wash can create passion and tension. A warm white wash can make a speech or ceremony look natural and elegant.
Wash beams are also better for group coverage. If you need to light a choir, a group dance, a band, or a conference panel, a wide wash is usually more practical than several narrow spots. It reduces harsh shadows and helps every person on stage look visible.
But wash lighting also needs control. If the angle is too wide, light may spill onto walls, screens, curtains, or audience areas. This can reduce contrast and make the stage look flat. If the wash is too weak or uneven, some areas may appear dark while others are too bright.
Spot or Wash: How to Choose?
The easiest way to choose is to ask: do you want to highlight something or fill something?
Use a spot beam when you want to highlight a performer, create a strong aerial beam, show movement, or form a clear visual direction. Use a wash beam when you want to cover a stage area, create color atmosphere, support group performance, or soften the overall picture.
In many professional lighting designs, spot and wash are not separated. They work together. The wash creates the base mood, while the spot creates focus. For example, in a live concert, wash lights may cover the whole stage in deep blue, while beam moving heads create narrow white lines above the singer. The wash gives atmosphere, and the spot gives energy.
A good lighting design is not about using only one type of beam. It is about balancing narrow and wide beams so the stage has both structure and emotion.
2. Angle Calculation: How to Estimate Coverage Area from Hanging Height
Many beginners aim lights by feeling. This can work in small events, but for professional stages, it is better to understand basic angle calculation. When you know the hanging height and beam angle, you can estimate how large the light area will be on the stage.
This helps you answer practical questions such as: Will this fixture cover the whole stage? How many lights do I need? Will there be dark zones between fixtures? Is the beam too wide for this distance?
The Simple Logic Behind Beam Coverage
The higher the fixture is hung, the larger the light circle becomes. The wider the beam angle, the larger the coverage area becomes. So coverage depends mainly on two things: distance and beam angle.
A simple rule is:
Coverage diameter becomes larger when hanging height or beam angle increases.
For example, if two lights have the same beam angle, the one hung higher will cover a larger area. If two lights are hung at the same height, the one with a wider beam angle will cover a larger area.
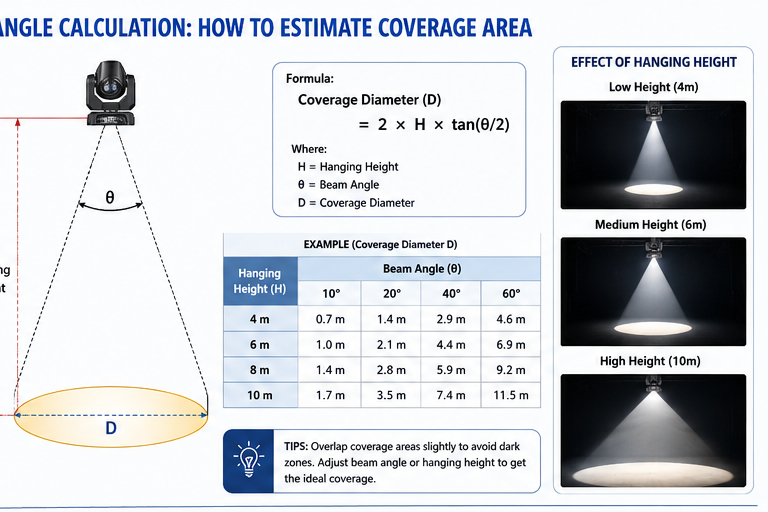
A Practical Formula for Coverage Diameter
A common approximate formula is:
Coverage Diameter = 2 × Hanging Distance × tan(Beam Angle ÷ 2)
You do not need to be a math expert to use this idea. The formula simply means that the beam expands outward as it travels. The angle controls how fast it expands.
For example, suppose a fixture is hung 6 meters above the stage and has a 20-degree beam angle. Half of 20 degrees is 10 degrees. The coverage diameter will be about:
2 × 6 × tan(10°), which is around 2.1 meters.
This means the light will cover a circle about 2.1 meters wide on the stage.
If the beam angle changes to 40 degrees at the same height, the coverage becomes much wider. The result is about 4.4 meters. This shows why zoom control is so useful. By changing the beam angle, one fixture can switch from a narrow highlight to a wider wash area.
Hanging Height and Real Stage Use
In real projects, hanging height can vary greatly. A small indoor stage may have lights hung only 3 to 4 meters high. A theater or banquet hall may use 5 to 8 meters. A concert truss or outdoor festival stage may place fixtures 10 meters or higher.
At lower heights, wide beams may spread too much and cause light spill. Narrow beams may be better for clean control. At higher positions, narrow beams may become too small if they are not adjusted, while wide beams may be useful for covering large areas.
For example, if a wash light is hung 4 meters above a small stage, a 60-degree beam may cover a very wide area and spill beyond the performance zone. But if the same fixture is hung 10 meters high on a large stage, the wide angle may be exactly what is needed.
This is why lighting design should not only look at fixture power. A powerful light with the wrong angle may still create poor results. The right beam angle can make medium-power fixtures look more effective, because the light is placed exactly where it is needed.
Avoiding Dark Zones
When several lights are used together, the coverage areas should overlap slightly. If there is no overlap, dark gaps may appear between beams. If there is too much overlap, some areas may become too bright.
For wash lighting, smooth overlap is very important. In a conference, wedding, or theater scene, uneven brightness can look unprofessional. The audience may not notice the exact reason, but they will feel that the stage is not clean or balanced.
For beam effects, dark zones may not always be a problem. In fact, contrast between light and darkness can make beam movement more dramatic. But for front light, face light, and general wash, balanced coverage is usually necessary.
Considering Fixture Tilt Angle
Hanging height is not the only distance to consider. If a fixture points straight down, the distance is close to the vertical height. But if the fixture is tilted toward the front or back of the stage, the beam travels farther. This means the coverage area becomes larger and the brightness becomes weaker.
For example, a light hung 6 meters high may travel 8 or 9 meters before reaching the target if it is angled sharply. This changes both coverage and intensity. The more angled the light is, the more you need to check whether the beam still reaches the target with enough brightness.
This is especially important for front lighting. If front lights are placed too far from the stage and angled too flat, they may create long shadows or uneven facial lighting. A better angle usually comes from balancing height, distance, and direction.
3. Focusing Techniques: Sharp Edge and Soft Edge Control
Focusing is the process of adjusting the fixture so the beam looks correct on the target. It includes direction, size, edge quality, and sometimes gobo sharpness. A well-focused light looks intentional. A poorly focused light looks random, even if the fixture itself is expensive.
One of the most important focusing choices is edge quality. Should the beam have a sharp edge or a soft edge? The answer depends on the purpose of the light.
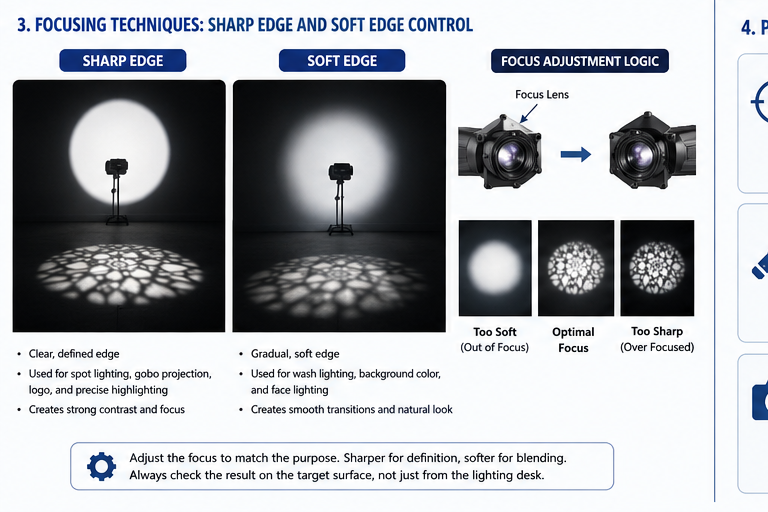
What Is a Sharp Edge?
A sharp edge means the border of the light is clear and defined. You can easily see where the light begins and ends. Sharp edges are common in spotlights, profile lights, and fixtures using gobos.
Sharp edges are useful when you need precision. In theater, a sharp-edged light can isolate one actor from the rest of the stage. In a product launch, it can create a clean circle around the product. In a logo projection, sharp focus is necessary so the image can be read clearly.
Sharp edges also create a sense of discipline and structure. They make the stage look controlled. When several sharp beams cross in the air, the visual impact can be very strong, especially with haze.
However, sharp edges may also look harsh. If used on faces, they can create strong shadows. If used across a group of performers, people near the edge may look half-lit and half-dark. Therefore, sharp focus should be used carefully when comfort and natural appearance are important.
What Is a Soft Edge?
A soft edge means the border of the light fades gradually. The audience cannot clearly see a hard line between light and darkness. Soft edges are often used for wash lighting, face lighting, background color, and large-area coverage.
Soft edges are good for blending. When several lights overlap, soft edges help create a smooth and even surface. This is very useful for conferences, weddings, theater washes, and camera recording. Soft light often looks more natural on people’s faces and clothes.
Soft edges also make transitions feel gentle. If the lighting design needs to support a romantic wedding, a calm speech, or a warm dinner atmosphere, soft focusing is usually better than hard focusing.
The limit of soft edges is that they reduce precision. If you need to light only one object or avoid light spilling onto a screen, soft edges may not be accurate enough. In that case, sharper focus or beam-shaping tools may be needed.
How to Switch Between Sharp and Soft Edges
Many fixtures allow focus adjustment through a lens system. Moving the focus lens changes how sharp or soft the beam appears. For profile lights, ellipsoidal lights, and some moving heads, this adjustment can also affect gobo clarity.
The practical logic is simple: sharpen the focus when you need definition, and soften the focus when you need blending.
For example, if you are projecting a gobo pattern on the floor, adjust the focus until the pattern edges look clear. If you are washing a background curtain with color, soften the edge so different fixtures blend smoothly.
In a concert, sharp focus may be used for aerial beams and gobo effects. In the same show, soft focus may be used for side wash and back wash. This combination creates both powerful effects and comfortable coverage.
Focus for Performers
When lighting performers, focus should support visibility and emotion. A singer may need a clear key light on the face, but the edge should not be so sharp that it cuts across the body unnaturally. A dancer may need wider side light so movement remains visible across the stage. A speaker may need soft front light to avoid harsh shadows under the eyes.
For moving performers, the beam should usually be larger than the person’s exact position. This gives them space to move without leaving the light. For fixed performers, such as a pianist or host at a podium, the beam can be more precise.
Focus for Cameras
If the event is being recorded or live-streamed, focusing becomes even more important. Cameras see lighting differently from human eyes. A beam that looks acceptable in the venue may appear too bright, too sharp, or too uneven on camera.
Soft, balanced front light is usually better for camera work. Strong back beams and sharp effects can still be used, but they should not overpower faces. If the performer’s face is dark while the background is bright, the camera image will look unbalanced.
For video production, test the focus through the camera monitor, not only with the naked eye. This helps you see overexposure, shadows, and uneven coverage before the event begins.
4. Practical Beam Direction Tips for Maximum Impact
Good beam direction is a combination of planning and adjustment. Before hanging fixtures, consider the stage size, ceiling height, truss position, performer movement, audience view, and camera angle. After installation, focus each fixture carefully instead of relying only on default settings.
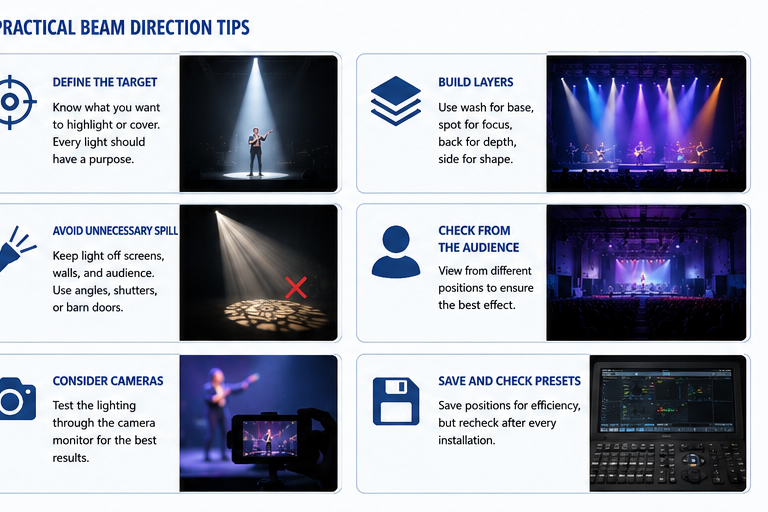
First, define the main visual target. Is it the singer, the dance group, the product, the background, or the whole room? Every fixture should have a purpose. A light without purpose often creates clutter.
Second, build layers. Use wash lights for base atmosphere, spot beams for focus, back lights for depth, and side lights for shape. When these layers work together, the stage looks three-dimensional.
Third, avoid unnecessary spill. Light that falls onto screens, audience eyes, black curtains, or technical equipment can weaken the design. Use narrower angles, shutters, barn doors, or better aiming to keep the beam clean.
Fourth, check from the audience position. A beam may look good from the lighting desk but different from the front row or balcony. Walk around the venue and see how the direction feels from different viewing angles.
Fifth, save focus positions if using moving heads. For repeated events, accurate position presets can save time and improve consistency. But presets should still be checked after installation, because truss height and fixture position may change.
Conclusion
Beam direction control is one of the most practical skills in stage lighting. A narrow spot beam creates focus, energy, and dramatic impact. A wide wash beam creates coverage, atmosphere, and comfort. By understanding beam angle, hanging height, coverage area, and focus edge quality, lighting designers can make better decisions before and during an event.
The goal is not simply to make the stage brighter. The goal is to guide the audience’s attention, support the performance, and create a visual experience that feels professional and memorable. When focus and angles are controlled correctly, every beam has a reason, every wash has a purpose, and the whole stage becomes more powerful.


Blue Sea Lighting is an enterprise with rich experience in the integration of industry and trade in stage lighting and stage special effects related equipment. Its products include moving head lights, par lights, wall washer lights, logo gobo projector lights, power distributor, stage effects such as electronic fireworks machines, snow machines, smoke bubble machines, and related accessories such as light clamps.
Quick Links
For more questions subscribe to our email